
By TOM BOWSER
The following tutorial explains how to use an existing drum track as a guide to create a new drum track that uses a drum sample for each drum hit. The new drum track can be used on its own or blended with the original drum track to enhance it.
To Create a Drum Sample Replacement Track:
- Import your drum audio sample/file into Pro Tools as a new track. Follow my tutorial "Import Audio Files as New Tracks" if you need help. The drum sample/file will be positioned at the beginning of the track once it has been imported.
- Drag the new track directly above the original drum track (in the Edit window). This process WILL NOT work if you do not place the new track above the original track. See image below.

- Enable "Commands keyboard Focus" by left-clicking on the Commands Keyboard Focus button (a/z) in the upper right corner of the Pro Tools Edit window. It turns from grey to yellow when enabled.

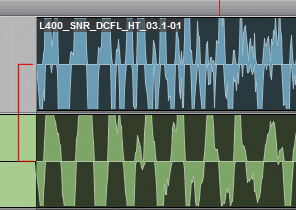
- Left-click on the bottom half of the drum sample/file to select it. It will darken once it is selected. See image below.

- Press and hold down the Ctrl key on your keyboard then press the letter c key. This will "copy" the sample file (kick.new in the above example) into your computer's short-term memory.
- Press and hold down the Ctrl key and click on the track name of both the original and the new drum track to select them. The background of the track name will turn white on each track that is selected. See image below.

Create a "Group" for Your Tracks:
- Press the Ctrl key then the letter "g" on your keyboard to open the "Create Group" window. You should see the tracks you selected listed in the "Currently in Group" box on the right hand side of the window.
When tracks are grouped many editing and other manipulations performed on one track in the group will automatically be performed on all other tracks in the group. For example, if you raise the fader/level of one track in a group the fader level of all other members of the group will increase.
- Type a name in the "Name" text box located at the upper left corner of the Create Group window. For example, the name "Kick.new" if you are working with kick drum tracks

- Click the "OK" button to save your selections.
- Left click on the "Tab to Transient" button located at the top of the Pro Tools Edit Window to enable it. I've drawn a red rectangle around it in the image below.

- Left click inside the original track slightly before the first drum hit.
- Press the TAB key on your keyboard to move the blinking cursor to the first drum hit on the original drum track.
- Press the "v" key on your keyboard to paste a copy of the drum sample into the new track. A copy of the drum sample should be pasted into the new audio track only. It should be located in line with the start of the drum hit of the original drum track. See image below.

- Continue pressing the TAB then the v key until you've pasted a drum hit into the new track for each drum hit that exists in the original track. See the image below.
Finishing Up:
- Disable the group you created (kick.new in this example) by left clicking on it's name. It is listed under the GROUPS heading at the bottom left corner of the Pro Tools Edit and Mix windows (see image below).
Once you click on the group name it should no longer have a grey background. When the group name no longer has a grey background the tracks of the group are no longer joined. The tracks can now be independently edited/manipulated.

- Delete the original drum sample you imported into the new track you created. It will NOT be in sync with the original track.
Listen to both drum tracks together (soloed) to verify drum hits of both tracks occur at the same time. If they do not you may have to nudge all of the drum hits of the new track slightly forward or backward on the timeline to ensure they are in sync with the drum hits of the original track. You may also have to trim/cut your sample differently.
TIPS:
- If your sample files paste into/over the original tracks drum hits instead of into the new track you created:
- Repeat the steps listed above in the order they are listed. You must copy your sample file into computer memory BEFORE creating the new group or this process will NOT work as I've described it.
- You must place the new track you created ABOVE the original when working in the Edit window.
- Stack both the original and new drum tracks one above the other. Zoom in and verify the drum hits of both tracks begin in the same way and at the same time ("in phase") on the tracks timeline. The sample and the original drum hit should look similar at the beginning of the hit. If the original drum hit waveform moves downward at the beginning then the sample should mirror it and also begin moving downward at the beginning of the drum hit.
If the drum hit waveforms begin moving in the same direction at approximately the same point on the time line they should be in phase with each other (listen). Your drum hits will have more impact/punch if you blend them together when they are in phase. See image below.
- Make only the tracks you are working on visible in the edit window. This keeps your workspace uncluttered making it easier to focus on what you're working on.