Monday, September 14, 2020

Record From One Track to Another - Pro Tools

By TOM BOWSER

NOTE: The method I describe below will NOT work with some older versions of Pro Tools.

Use this method to record (print) the effects or processing plug-ins used on one track to a NEW track. The effects or processing will be incorporated into the new track. You can then make the original track with the effects or processing plug-ins on it inactive. This will reduce the computer resources (RAM + CPU) consumed to run the plug-ins in real time on the original track.

For this tutorial I used Waves Tune to correct a few pitch problems on a vocal track. I then recorded the pitch corrected track to a new track.

To Record From One Track to Another:

  1. Set the volume level of the original track to 0. This is the track you want to copy. See image below.
Zero the volume level of a track in the Pro Tools Edit Window
  • If the volume is NOT 0:
    • Press and hold down the ALT key on your keyboard.
    • Left click on the number to the right of "vol" (volume) in the tracks I/O section of the Edit Window. The number will reset to 0.0.
  1. Left click on the "Audio Output Path selector" button of the track you want to copy. The output button is the second button listed under I/O in the Edit Window. If the I/O section is NOT visible go to "Tips:" at the end of this tutorial to learn how to display it.
Audio Output Path selector button in Pro Tools
  1. Left click on "new track…" on the menu that appears. The new track window appears.
Create a new track to record to in Pro Tools
  1. Left click on the drop arrows of the New Track window to choose:
    • Width: Mono
    • Type: Audio
    • Time Base: Samples (the default)
    • Name: Choose a name for your new track. I chose: Lvox - Jimmy - Tuned
New Track window in Avid Pro Tools

For this tutorial I'm recording a mono vocal track. The new track I record to needs to be mono. If you record a stereo track, for example a stereo keyboard track you will probably want to record to a stereo track.

  1. Left click on the "Create" button to create the new track you will use to copy your original track to. The original track will automatically have its output changed to the new track you created. The new track will automatically have its input set to the original track. See image below.
Copy one track to another in Avid Pro Tools

To record the original track to the new track:

  1. Left click on the "Return to Zero" transport button to move the playback cursor to the beginning of both tracks.
Return to Zero transport button in Avid Pro Tools
  1. Left click on the "Track Record Enable" button of the new track. It will begin to blink.
Track Record Enable button in Avid Pro Tools
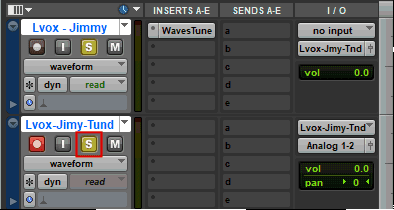
  1. Left click on the "S" (solo) button of the original track to enable it. It will turn yellow when enabled. Left click on the solo button of the new track to listen as it is recorded. See image below.
Track solo button in Avid Pro Tools
  1. Left click on the red "Record Enable" button of the Pro Tools "Transport" window. It will begin to blink.
Record enable button of the Pro Tools Transport
  1. Left click on the green "Play" button to begin recording the original track to the new track.
Play button of the Avid Pro Tools Transport

Tips:

  • Once you have finished recording to the new track you need to route the output of the new track as you want it for your mix.
  • Right click on a tracks name then left click on "Make Inactive" to deactivate a track. Once a track has been made inactive it no longer consumes computer resources.
  • When you hover your mouse cursor over a button in the Pro Tools interface you will see a tool tip that shows its name.

If the I/O section is NOT visible on the Pro Tools channel strip:

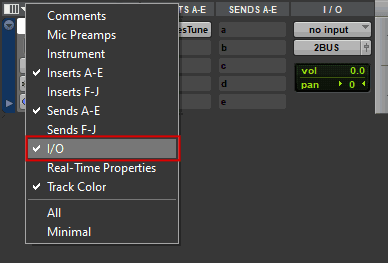
  1. Left click on the drop down arrow in the upper left corner of the Edit Window. See image below.
Display IO section of Edit window in Avid Pro Tools
  1. Left click on I/O within the menu that appears to place a checkmark next to it.
Display IO menu in Avid Pro Tools