Wednesday, September 7, 2022

Adjust Clip Gain With Mouse Scroll Wheel - Pro Tools

By TOM BOWSER

Use your mouse scroll wheel to make changes in Clip Gain level that are difficult to make by dragging the Clip Gain line.

  1. Show the "Clip Gain Line" if it is not visible.
    • Press and hold down the START+SHIFT then Hyphen (-) keys on your keyboard. The "START" key is also referred to as the "Windows" key. It has the Windows logo on it.

The Clip Gain Line is visible in both clips below. It is the black line across the width of the clip.
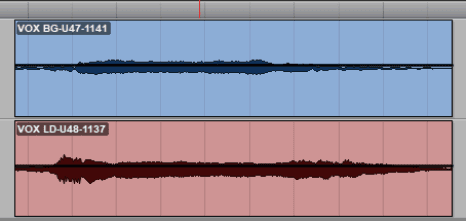
Vocal Tracks With Clip Gain Line Showing in Avid Pro Tools
  1. Select a clip or section within a clip to adjust its clip gain.
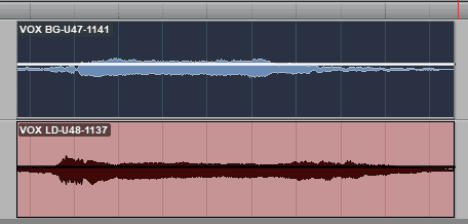
Vocal Tracks With Clip Gain Increased Using Mouse Scroll Wheel In Avid Pro Tools
  1. Press and hold down the Windows START and SHIFT keys.
  2. Roll your mouse scroll wheel:
    • forward to increase the clip gain level
    • backward to decrease clip gain level

I've increased the Clip Gain level of the top clip relative to the bottom clip. See image above. Notice the size of the top clip has increased vertically to illustrate an increase in Clip Gain level.

TIPS:

  1. In the above example, I show a section of two vocal tracks. I demonstrate using clip gain to increase the gain level of the top track to better balance the relative levels of both tracks. You can use Clip Gain to adjust and balance the level of sections or entire tracks prior to or perhaps without using compression.
  1. To select a clip:
    • Left click on the lower half of the clip (below the Clip Gain line).
  1. To select a section within a clip:
    • Left click within the track where you want to begin your selection.
    • Press and hold down your left mouse button.
    • Drag your mouse in the direction you want to make your selection.
    • Release your left mouse button once you've completed your selection.
  1. LISTEN to any clip gain changes you make. Do NOT rely solely on what the clip looks like to assess the result of Clip Gain changes.

Sunday, August 21, 2022

Color Code a Track's Channel Strip - Pro Tools

By TOM BOWSER

Color coding a track's channel strip is one way to keep a Pro Tools session organized. If the session is organized you will be able to work more quickly with less stress. You will have more time and mental energy available to express your creativity.

To color code a track's channel strip:

  1. Left click on the "Name Button" of the track channel strip you want to color code. The background behind the track name will turn white. See the image in step two below.
  1. Double left click on a track's color bar to open the Color Palette. Color bars are located above and below each track channel strip in the Mix Window. Color Bars are located to the left of each track in the Edit Window.

    The track color bar in the image below is the blue vertical bar to the left of the track. This is as it appears in the Edit Window.

Channel Strip In The Edit Window of Avid Pro Tools
  1. Left click on a color within the Color Palette to choose it. The color you choose will become outlined in white. See the next image in these directions for an example.
  2. Left click on the "Apply to Channel Strip" button. I've outlined the Apply to Channel Strip button in red within the image below. It turns light blue once you click on it.
Color Palette with Apply to Channel Strip button in Avid Pro Tools
  1. Left click on the "Saturation" slider and hold your left mouse button down then drag it to the RIGHT until the track color strip looks the way you want it. I've outlined the Saturation slider in red within the image below.
Color Palette Showing Saturation Slider in Avid Pro Tools

TIPS:

  • Hold down the CTRL key on your keyboard while dragging the Saturation slider to make very small changes in saturation level.
  • Adjust the "Brightness" slider as desired.
  • A tracks color bar can be changed. See my Quick Start Color Code A Track's Color Bar.

Saturday, June 11, 2022

Mixing Heavy Guitars and Guitar Tone

By TOM BOWSER

New to mixing heavy guitars? Bobby Torres from Frightbox Recording shows you how in his video, using the free tools and downloads listed below.

Free downloads:

  1. Download the guitar, drum, and bass tracks and a free IR (impulse response) taken from the Mesa Boogie cab in Bobby's studio.
  2. Amped Roots: A free guitar amp simulator used in the tutorial.
  3. Ignite Emissary Bundle: Includes the free NadIR Impulse Response Loader you need to load the IR Bobby provides.

All items listed are free. You do have to supply your e-mail address. You will receive offers and information about products. You can unsubscribe at any time.

Thursday, March 3, 2022

Hide or Show Clip Names - Pro Tools

By TOM BOWSER

Editing drums using Beat Detective? Hide clip names to keep the Edit window clutter-free.

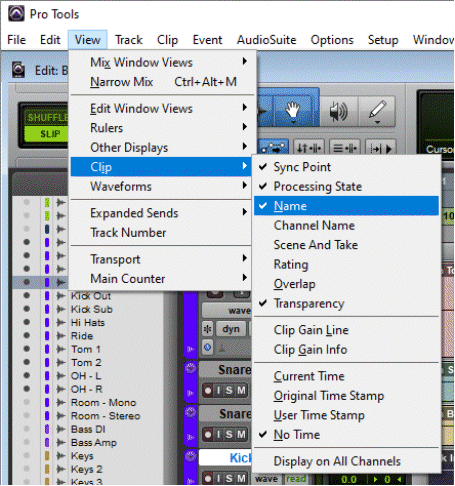
  • Left click on "View", hover over "Clip", then left click on "Name" to remove the check mark to the left of the word Name.

Hide Clip Names in Avid Pro Tools

Names will no longer show for each clip within a track in the Edit window. Repeat the above step and add a check mark next to Name to show clip names.

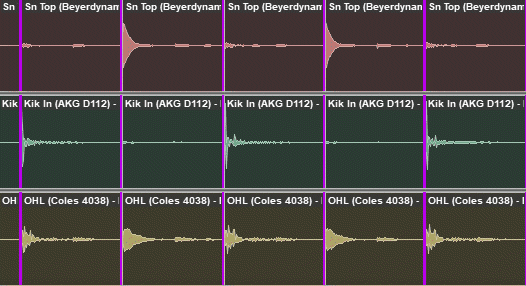
Clip names showing:

Audio Clips With Clip Names Showing

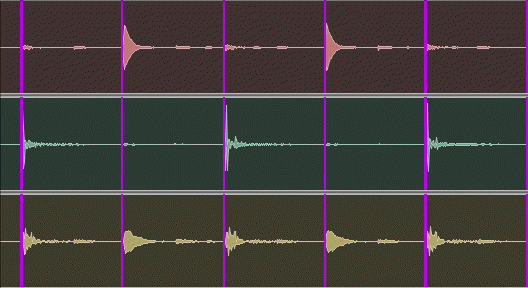
Clip names hidden:

Audio Clips With Clip Names NOT Showing

Monday, January 10, 2022

Show or Hide the Grid Lines - Pro Tools

By TOM BOWSER

  • Left click on the "Grid" button to toggle the grid lines on or off within the Edit window. I've drawn a red line around the Grid button in the image below.
Show or Hide the Grid Lines in Pro Tools