Tuesday, September 15, 2020

Quickly Open an Existing Session - Pro Tools

Quickly Open an Existing Session:

  • Press and hold down the CTRL + the letter O key.

Monday, September 14, 2020

Record From One Track to Another - Pro Tools

By TOM BOWSER

NOTE: The method I describe below will NOT work with some older versions of Pro Tools.

Use this method to record (print) the effects or processing plug-ins used on one track to a NEW track. The effects or processing will be incorporated into the new track, and you can then make the original track with the effects or processing plug-ins on it inactive. This will reduce the computer resources (RAM and CPU) consumed to run the plug-ins in real time on the original track.

For this tutorial I used Waves Tune to correct a few pitch problems on a vocal track. I then recorded the pitch corrected track to a new track.

To Record From One Track to Another:

  1. Set the volume level of the original track to 0. This is the track you want to copy. See image below.
Zero the volume level of a track in the Pro Tools Edit Window
  • If the volume is not 0:
    • Press and hold down the ALT key on your keyboard.
    • Left click on the number to the right of "vol" (volume) in the tracks I/O section of the Edit Window. The number will reset to 0.0.
  1. Left click on the "Audio Output Path selector" button of the track you want to copy. The output button is the second button listed under I/O in the Edit Window.
Audio Output Path selector button in Pro Tools
  1. Left click on "new track…" on the menu that appears. The New Tracks window opens.
Create a new track to record to in Pro Tools
  1. Left click on the drop arrows of the New Tracks window and choose:
    • Width: Mono.
    • Type: Audio Track.
    • Time Base: Samples (the default).
New Tracks Window in Avid Pro Tools

For this tutorial I'm recording a mono vocal track. The new track I record to needs to be mono. If you record a stereo track, for example a stereo keyboard track you will probably want to record to a stereo track.

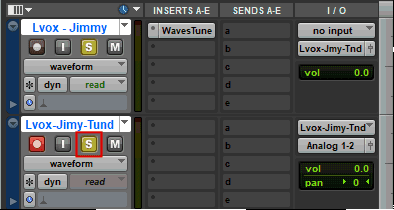
  1. Left click on the "Create" button to create the new track you will use to copy your original track to. The original track will automatically have its output changed to the new track you created. The new track will automatically have its input set to the original track. See image below.
Copy one track to another in Avid Pro Tools

To record the original track to the new track:

  1. Left click on the "Return to Zero" transport button to move the playback cursor to the beginning of both tracks.
Return to Zero transport button in Avid Pro Tools
  1. Left click on the "Track Record Enable" button of the new track. It will begin to blink.
Track Record Enable button in Avid Pro Tools
  1. Left click on the "S" (solo) button of the original track to enable it. It will turn yellow when enabled. Left click on the solo button of the new track to listen as it is recorded. See image below.
Track solo button in Avid Pro Tools
  1. Left click on the red "Record Enable" button of the Pro Tools "Transport" window. It will begin to blink.
Record enable button of the Pro Tools Transport
  1. Left click on the green "Play" button to begin recording the original track to the new track.
Play button of the Avid Pro Tools Transport

Tips:

  • Once you have finished recording to the new track you need to route the output of the new track as you want it for your mix.
  • Right click on a track's name, then left click on "Make Inactive" to deactivate a track. Once a track has been made inactive it no longer consumes computer resources.
  • When you hover your mouse cursor over a button in the Pro Tools interface you will see a Tool Tip that shows its name.

If the I/O section is NOT visible on the Pro Tools channel strip:

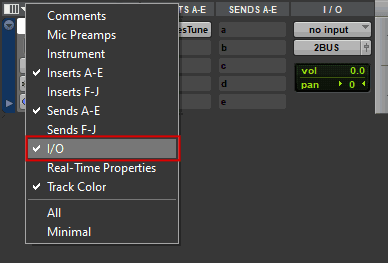
  1. Left click on the drop down arrow in the upper left corner of the Edit Window. See image below.
Display IO section of Edit window in Avid Pro Tools
  1. Left click on I/O within the menu that appears to place a checkmark next to it.
Display IO menu in Avid Pro Tools

Friday, August 28, 2020

Quickly Switch Between Edit Modes - Pro Tools

By TOM BOWSER

Quickly Switch Between Edit Modes:

Pro Tools has four Edit modes: Shuffle, Slip, Spot and Grid. See image below.

Pro Tools Edit Modes: Shuffle, Spot, Slip, and Grid.

Quickly Switch Between Edit Modes by pressing the:

  1. F1 key to enter Shuffle mode.
  2. F2 key to enter Slip mode.
  3. F3 key to enter Spot mode.
  4. F4 key to enter Grid mode.

TIP: Press F4 a second time to enter "Relative Grid" mode.
Remove Output Meters From Edit Window Toolbar - Pro Tools

By TOM BOWSER

Remove Output Meters From Edit Window Toolbar:

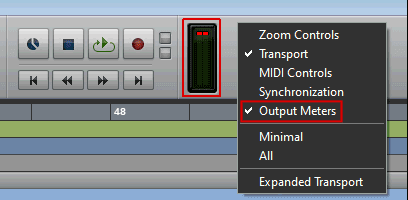
  1. Right click on a blank area of the Edit window toolbar.
  2. Left click on the words "Output Meters" to remove the checkmark. See image below.
Pro Tools Edit Window Output Meters

Show or Hide the Clip Gain Line - Pro Tools

Show or Hide the Clip Gain Line:

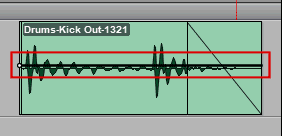
  1. Press and hold down the Shift + Windows Start keys then press the - key (hyphen) on your keyboard. Press the - key again to toggle the Clip Gain line.
Clip Gain Line visible in Avid Pro Tools

The Clip Gain line is only visible if the track is set to size small or larger.

NOTE: The Windows Start key has the Windows symbol on it. See image below.

The Windows Start key

Reduce Editing Mistakes With Shuffle Lock - Pro Tools

By TOM BOWSER

Reduce Editing Mistakes With Shuffle Lock:

Use "Shuffle Lock" to prevent accidental editing while in Shuffle Mode.

To engage Shuffle Lock:

  1. Press and hold down the Ctrl key on your keyboard.
  2. Left click on the 'Shuffle' edit mode button of the Edit Window Tool Bar. A small lock will appear to the left of the Shuffle button. See the image below.
Shuffle Lock enabled in Avid Pro Tools

NOTE: You cannot enable Shuffle Lock while in Shuffle mode.

Show or Hide the Clip Gain Icon - Pro Tools

By TOM BOWSER

Show or Hide the Clip Gain icon:

  1. Press and hold down the SHIFT + Windows Start keys, then press the = key on your keyboard. Press the = key again to toggle the Clip Gain icon.

I've drawn a red line around the Clip Gain icon in the image below.

Clip Gain icon in Avid Pro Tools

NOTE: The Windows Start key has the Windows symbol on it. See image below.

Pro Tools Clip Gain icon

Redo a Previously Undone Operation - Pro Tools

Redo a Previously Undone Operation:

  • Press and hold down the Shift key, then Ctrl, then the Z key on your keyboard.

Markers - How to Move a Marker - Pro Tools

By TOM BOWSER

Markers - How to Move a Marker:

  1. Left click and hold down the left mouse button on the marker you want to move.
  2. Drag the marker to its new location.
  3. Release your left mouse button.

Zoom In or Out Using Your Mouse - Pro Tools

Zoom In or Out Using Your Mouse:

  1. Press and hold down the ALT key on your keyboard.
  2. Scroll your mouse wheel forward to zoom in and backward to zoom out horizontally.

Bypass a Plug-in - Pro Tools

By TOM BOWSER

Bypass a Plug-in:

  1. Press and hold down the CTRL key on your keyboard.
  2. Left-click on the plug-in button.

The bypassed plug-in button will change colors from gray to blue. I've drawn a red line around a bypassed EQ plug-in within the image below.

Bypassed Pro Tools Plugin

To re-enable the plug-in repeat the steps you followed to bypass the plug-in.

Scroll Left or Right on the Timeline - Pro Tools

By TOM BOWSER

Scroll Left or Right on the Timeline

These tips enable you to easily and quickly scroll left (earlier) or right (later) on the Pro Tools timeline. You need a mouse with a middle scroll wheel or a track pad to use method 1 below. Method 2 uses keyboard keys only.

Method 1:

  1. Press and hold down the SHIFT key on your keyboard.
  2. Rotate your mouse scroll wheel forward to move left (backward) on the timeline.
  3. Rotate your mouse scroll wheel backward to move right (forward) on the timeline.

Method 2:

  1. Press and hold down the ALT key on your keyboard.
  2. Press the Page Up key to move left/earlier on the timeline.
  3. Press the Page Down key to move right/later on the timeline.

Show Only a Single Automation Type - Pro Tools

By TOM BOWSER

Show Only a Single Automation Type:

  1. Right-click on the Show/hide automation lanes button. I've drawn a red line around it in the image below.

Automation Enable button in Pro Tools Plug-in

  1. Left-click on the automation type you want to show from the menu.

Automation Enable button Menu in Pro Tools Plug-in

Narrow or Expanded Mix Window View - Pro Tools

By TOM BOWSER

If you have a lot of visible tracks in a session, it can be useful to change to a narrow mix view to reduce the width of the tracks. This makes the session feel less cluttered. You can also fit more tracks in the same viewable space of the Pro Tools mix window.

Narrow or Expanded Mix Window View

  • Press and hold down the CTRL + ALT + the M keys on your keyboard.

Pressing the M key allows you to toggle between Narrow or Expanded view.

Narrow or Expanded Mix Window View  in Pro Tools

Hide or Show all Tracks Simultaneously - Pro Tools

By TOM BOWSER

Hide or Show all Tracks Simultaneously:

  1. Press and hold down the ALT key on your keyboard.
  2. Left-click on the Show/Hide icon of any track in the Track List.

NOTE: The Track List is located at the top left of the Pro Tools Edit and Mix windows. The track Show/Hide icon is the black dot to the left of a track name in the Track List. I've drawn a red square around the Show/Hide icon in the image below.

Tracks List Window in Pro Tools

Deactivate All Plug-ins in a Session - Pro Tools

Deactivate All Plug-ins in a Session:

  • Open a Pro Tools session while holding down the SHIFT key to deactivate all plug-ins in the session.

Quickly Remove an Edit Window View - Pro Tools

By TOM BOWSER

Quickly Remove an Edit Window View:

  1. Press and hold down the ALT key on your keyboard.
  2. Left-click on an Edit window view name to remove the view.

The image below has three different Edit window view names showing. The names are INSERTS A-E, SENDS A-E and I/O. I've drawn a red line around all 3 window view names in the image below.

Remove Edit Window Views in Pro Tools

Quickly Scroll Track Views - Pro Tools

Quickly Scroll Track Views:

  1. Left-click in the upper half of the track.
  2. Press and hold down the CTRL + Windows (has Windows logo on it) keys.
  3. Press either the left or right arrow keys on your keyboard.

Quickly Close the Pro Tools Application - Pro Tools

Quickly Close the Pro Tools Application:

  • Press and hold down the CTRL + Q key on your keyboard.

Quickly Save the Current Session - Pro Tools

Quickly Save the Current Session:

  • Press and hold down the Ctrl + S key on your keyboard.

Quickly Open a New Session - Pro Tools

Quickly Open a New Session:

  • Press and hold down the CTRL + N keys.

Quickly Close the Current Session - Pro Tools

Quickly Close the Current Session:

  • Press and hold down the Ctrl + SHIFT + W keys.

Enable Commands keyboard Focus - Pro Tools

By TOM BOWSER

Enable Commands Keyboard Focus:

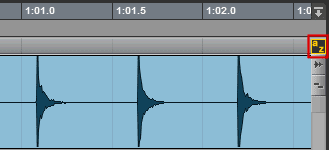
  • Left-click on the Commands Keyboard Focus button (a/z) at the upper right corner of the Pro Tools Edit window. I've drawn a red line around it (enabled) in the image below.

Track in Pro Tools showing the Commands Keyboard Focus button.

Quickly Reset a Control to its Default Setting - Pro Tools

Quickly Reset a Control to its Default Setting:

  1. Press and hold down the ALT key on your keyboard.
  2. Left-click on the control or inside its text box.

This tip works on native Pro Tools plug-ins.

Remove a Plug-in From an Insert Selector - Pro Tools

By TOM BOWSER

Remove a Plug-in From an Insert Selector:

  1. Left-click and hold the mouse button down on the gray dot to the left of the plug-in name. See image below.

Remove a Plug-in from a Pro Tools track

  1. Hover your mouse over the words "no insert".
  2. Release your left mouse button to remove the plug-in.

Toggle Between the Edit or Mix Window - Pro Tools

Toggle between the Edit or Mix window:

  • Press and hold down the CTRL then the = key on your keyboard to toggle between the Edit or Mix window.

Quickly Change Window Views - Pro Tools

Quickly Change Window Views:

  1. Right-click on any window view name at the top of a track.
  2. Left-click on the window view you want to add or remove from the menu that appears.

A Pro Tools channel strip showing Inserts, Sends and I/O window views.

Mac to PC Key Equivalents - Pro Tools

By TOM BOWSER

Mac to PC Key Equivalents

MAC KEYWINDOWS KEY
ControlCTRL
OptionALT
Command (4 leaf clover)Windows/Start (has Windows logo on it)
SHIFTSHIFT

Change Track Views - Pro Tools

By TOM BOWSER

Change Track Views

  1. Left-click on the "Track View" selector button or dropdown arrow. They are located below the track name in the Edit window. (surrounded in red within image below)

Pro Tools Track View Selector

The default track view is "waveform".

Route a Track Output to Multiple Inputs - Pro Tools

By TOM BOWSER

Route a Track Output to Multiple Inputs (Bus or Physical Output):

  1. Press and hold down the "Windows" key (has the Windows logo on it).
  2. Left-click on the track's output path selector button located under the I/O (Input/Output) section of the track.
  3. Choose where you want to route the signal (for example a bus or physical output).

You will notice a + sign added to the left of the tracks output path selector button. The +/plus symbol indicates the track output is routed to more than one location.

Show the Automation Window - Pro Tools

By TOM BOWSER

Show the Automation Window:

  1. Press the CTRL key then the number 4 on the numeric keypad of your keyboard.

The automation window shows the different types of automation that are currently enabled. You must enable any automation type you want to write. Enable automation by left-clicking on the button (turns red) for the automation type you want to enable.

Hide Channel Send Faders & Controls - Pro Tools

Hide Channel Send Faders and Controls:

  1. Left-click on "View" on the Pro Tools menu bar.
  2. Choose either Sends A-E or F-J.
  3. Left-click on the word "Assignments". You will no longer see the Send controls in the Edit or Mix windows.

Open Your Most Recent Pro Tools Session - Pro Tools

Open Your Most Recent Pro Tools Session:

With Pro Tools Running:

  • Press and hold down the CTRL + SHIFT then the letter "O" keys.

Suspend All Groups - Pro Tools

Suspend All Groups:

  1. Press and hold down the CTRL + SHIFT + the letter G key on your keyboard. While holding down the CTRL and SHIFT keys, the G key can be used to toggle the suspend state from enabled to disabled.

Quickly Rename a Track - Pro Tools

Quickly Rename a Track:

  1. Double left click on the track name.
  2. Type a new name for the track.
  3. Click "OK" to save your changes.

Drums - Isolating - Outside/External Bass/Kick Drum Microphone

Video Created by JOEL CAMERON - Transcribed by TOM BOWSER

Why do we want to reduce/eliminate the snare and cymbal leakage into the kick mic/track? Anything done to the kick drum mic/track (EQ for example) will also be done to the snare drum and cymbal leakage. The result of processing the leakage can cause drums to sound indistinct and can cause strange frequency interactions.

EQ changes to the bass/kick drum will affect the sound of the drum and cymbal tracks present in the leakage which becomes noticeable when these tracks are added to the entire mix.

In this tutorial, we compress the external bass/kick drum mic. We will create a send from the snare drum to trigger the compressor on the kick. This will reduce the level of the snare present in the bass/kick drum track. This approach also allows you to keep all the kick/bass drum resonance the outside microphone captures. If you use an Expander / Gate you may lose some of the bass/kick drum resonance.

NOTE: If the ATTACK and RELEASE times are too fast you may hear distortion. The distortion will sound like crackling. Increase the ATTACK and RELEASE times to eliminate the distortion. You may also have to reduce the amount of compression by reducing the THRESHOLD.

  1. Instantiate a compressor on the external kick drum mic/track.
  2. Create a pre-fader send (click on the PRE button on the track) on the top snare track and send the snare signal to an unused bus.
  3. Name the bus TOP SNARE SEND.
  4. Choose the bus selected in the previous step (TOP SNARE SEND) as the key input of the compressor on the kick/bass drum track.
  5. Enable the SIDE-CHAIN of the compressor by clicking on the tiny key in the SIDE-CHAIN section of the compressor. You can click on the tiny speaker to listen to the side-chain signal (it should be the snare) that the compressor is now using to trigger the compressor.
  6. Set the compression RATIO to 6 or so. Adjust as needed/desired.
  7. Speed up the ATTACK time from the default of 10ms to the compressors fastest setting (turn the ATTACK control fully counter clockwise) or lower to remove the attack/snap of the snare. If you hear crackling/distortion you may have the attack time too fast. Slow it down (turn the control/knob clockwise).
  8. Set the RELEASE at around 250ms or what sounds right for the music. For a more natural sound watch the GR meter to set a release speed that seems natural to the speed of the music.
  9. Adjust the THRESHOLD to the point you are seeing - 6 to -18 of gain reduction. This allows you to keep the sustain of a double headed kick drum (with both heads on while it was tracked).

Any additional leakage left after using this approach may be able to be removed using a LP (low pass filter) or other EQ.

NOTE: The speed of sound is approximately 1100 feet per second so about 1 foot per millisecond. The mic that is in front of the bass drum is probably around 3 feet from the snare mic. When the snare drum gets hit it takes about 3ms to reach the external kick mic.

By keying the compressor off of the snare's top mic and then using a pretty fast attack you can compress BEFORE the snare leakage reaches the mic. This allows you to effectively remove or at least significantly reduce the snare leakage in the external kick mic/track.

You will see greater headroom in the external kick drum track allowing you to raise the fader and achieve greater volume of the track in the mix.

Drums - Isolating and Emphasizing - Bottom Snare Drum Microphone

Video Created by JOEL CAMERON - Transcribed by TOM BOWSER

What are ghost notes? Ghost notes as they pertain to the drums are quiet notes usually played in between accented notes. They do not always have to be played in between accented notes. Ghost notes can be used to fill in the groove and give it more feel, rather than the groove sounding very straight and rigid.

Ghost notes may be more felt than heard. Musicians on the stage who are playing with the drummer may be able to feel the ghost notes and lock with the drummer better because the drummer is filling out the groove more and giving it more feel.

If ghost notes are present in the track you want them brought out and heard. If there is no ghosting you do not need to use this technique because the back beat will be the loudest thing in the track and will be the most audible over any leakage in the track (the kick for example).

Use compression to help the ghosting be heard:

  1. Instantiate a Pro Tools Compressor/Limiter Dyn 3 on the bottom snare track.
  2. Use a really fast ATTACK TIME (10.0us or so). To reduce the attack time (make it faster) turn the ATTACK knob on the DIGI Compressor / Limiter counterclockwise. With this approach we are going to try to even out the amount of snare response from the ghosting as from the snare heads.
  3. Increase the RATIO to around 8 to 1 so it's compressing pretty dramatically.
  4. Increase the RELEASE time from the default of 80ms to 160 to 180ms.
  5. Increase the GAIN as needed.

Looking for total compression of -12 dB or so.

Optional:

The bottom of the snare may be rattling just as much when the bass/kick-beater hits as it is with the strike of the drumstick. We can limit how much of the kick/bass drum we hear in the bottom snare mic using the following procedure.

  1. Create a pre-fader send (click on the PRE button) on the inside kick channel. Route the kick send/signal to an unused bus. Label the bus "KICK IN SEND".
  2. Instantiate a second compressor after (in serial) the first compressor on the bottom snare track (see above directions).
  3. Set the key input of the second compressor to the bus chosen for the kick drum send (KICK IN SEND).
  4. Enable the side-chain of the second compressor by clicking on small key located in the SIDE-CHAIN section of the DIGI Compressor / Limiter. Click on the tiny speaker to the right of the small key in the SIDE-CHAIN section of the compressor to listen and verify the bass/kick drum signal has been routed properly to the compressors side-chain. Turn the side chain listen off once you've verified the compressor is receiving the kick's send.
  5. Increase the ATTACK time (as fast as possible) by turning the control/knob counter-clockwise.
  6. Decrease/slow the RELEASE until it sounds natural (Example: 300-400 ms). Watch the gain reduction (GR) meter to get a sense of the speed of the compressors release time.
  7. Adjust the THRESHOLD to achieve -12dB or so of gain reduction. For a more natural sound increase the THRESHOLD until you see around -6dB of gain reduction.

NOTE: Verify your settings and how they affect the sound by toggling the compressor plugins BYPASS switch.