
By TOM BOWSER
I created this tutorial from a video tutorial by Bobby Torres at Frightbox Recording Academy.
I take a slightly different approach when performing the editing used to create the drum samples. I also list the Pro Tools editing shortcuts and key commands I use just in case you've forgotten them.
The information in the following two bulleted lists is taken directly from Bobby Torres's video tutorial. Why? I couldn't have said it any better!
Why would you want to make your own drum samples?
- When using drum samples of the actual kit used in a production, they will blend better with the rest of the drum kit, for example, with the overheads and rooms.
- You will end up with your own unique-sounding production, For example, if you want to go for a higher-sounding snare sound for a production you are working on you can tune the snare higher and then sample it. The samples will be unique to the project you're working on.
- You’ll also build up your own unique Slate Trigger library of drum sounds with every project you complete.
Record drum samples on a day you record the drums. To capture drum samples and keep the kick and snare sounding more natural:
- Have the drummer play a simple pattern for example, kick, snare, kick kick, snare, kick kick, snare, kick kick, snare at a normal velocity. It is boring for the drummer and the person doing the recording, but it will be worth it because you will end up with a very natural sounding kick and snare sample collection to choose from.
- Create Tom samples just in case you need to fly in a few if there is too much cymbal bleed in the actual drum performance.
- Create cymbal samples just in case something comes up and you need to fly in a cymbal hit. For example, the drummer hits his china just a little too light during an important section of a song, then you have a harder china hit you can fly in.
NOTE: You will want to create file samples for between five and ten hits of each drum or cymbal you want to trigger. For this tutorial, I created 5 samples.
Before beginning this tutorial:
- Open the Pro Tools session that contains the drum track you want to create samples from.
- Left click on the "SLIP" edit mode button to enable slip editing mode. It will turn green when enabled. See the image below.

- Grid lines are the light gray vertical lines in a track within the Edit window. If you do not see the Grid lines left-click on the word "Grid" to the left of the Grid Value selector. It will turn green when enabled. See image below.
- Enable "Commands keyboard Focus" by clicking on the Commands Keyboard Focus button (a/z) at the upper right corner of the Pro Tools Edit window. See image below. This will allow you to use the single key shortcuts I use in this tutorial.

- Enable the "Smart Tool" by left clicking on the bar above the Trim, Selector and Grabber tools. When the Smart Tool is selected it turns blue as do the Trim, Selector and Grabber tools. See image below.

How to create drum samples:
- Set the Pro Tools grid to 1/8 or 1/4 note depending on how much sustain each hit has and how long the decay of each hit is. 1/8 note was used for this tutorial. Left click the tiny drop down arrow to change the grid settings. I've drawn a red square around the drop down arrow in the image below. Left click on a note value to change to that value.

- Show/open the drum track you want to create samples from.
- Create a new audio track (press and hold down the Ctrl + SHIFT + n keys). Select "Audio Track". Use the name of the drum for the track name (for example, "kick"). Drag it below the track you want to create samples from.
- Change the size of both tracks to large. Right click the vertical bar to the left of the track then choose the track size from the menu. See image below.

- Find 5 drum hits that are approximately the same height on the track you want to sample.
- Zoom into the track until you can clearly see the transient/beginning of each drum hit. To zoom press and hold down the Ctrl key then repeatedly press the ] key (zoom out) or [ key (zoom in).
- Select the 5 drum hits. Left click before the first of the 5 drum hits you selected. Press and hold down your left mouse button then drag from left to right across all five hits. See image below.

- Press the letter c key on your keyboard to copy the selected drum hits.
- Left click inside the new track you created.
- Press the letter v key to copy the selected drum hits into the new track.
- Slide the left side of the copied drum hits clip to a grid line. Left click and hold down your left mouse button on the bottom half of the clip, then drag left.
- Adjust your zoom level as needed to match the image below.
- Select the first, left-hand drum hit (kick drum hit in this tutorial). See image below

- Press the letter b on your keyboard to separate the clip at both ends.
- Continue to separate (select the drum hit then press the b key) the rest of the drum hits you want to use for samples. Work methodically from left to right.
- Delete non drum hit clips that are remaining. Work methodically from one end of the track to the other. Left click on the bottom half of a non drum hit clip to select it, then press the x key to delete it. Continue until only separated drum hits remain.

- Left click on the bottom of the left most drum hit and drag it left to the nearest grid line.
- Drag the remaining drum hits so their left hand edge lines up with a grid line. The left hand edge of all the drum hits should be aligned with a grid line.

- Align your mouse cursor with the right-hand edge of the first (left-most) drum hit. The cursor will change to a left facing square bracket. This is the Trim Tool. I drew a red box around it in the image below.

- Press and hold down your left mouse button and drag the edge of the drum hit clip right or left as needed to the nearest grid line. Align the rest of the drum hits in the same way. Each drum hit needs to be uniform in length and within a pair of 1/8 note grid lines. See image below.

- Listen to verify that each hit sounds as it should. If a drum hit clicks or pops replace it with one of your good drum hits. Select the good hit then press the letter c to copy it and the letter v to paste it where you want.
- Add a 5 millisecond fade to the beginning and end of each hit to prevent pops or clicks. You may not hear a pop or click now, but you may if compression is applied to the hits in a mix.
To create the fades:
- Select the 5 drum hits. Left click before the first of the 5 drum hits. Press and hold down your left mouse button then drag from left to right across all five hits.
- Press and hold down the Ctrl then f key to call the Batch fades dialog.
- Type the number 5 in the box to assign the "Length" for both the Fade In and Fade out Operations. Click inside the box and enter a number.
- Left click on the "OK" button to create the fades.
Check each drum hit clip to verify that the transient/beginning of the drum hit is not cut off by the fade-in. See the image below for an example of a fade in that crosses into the transient of the drum hit. The two white lines that form a triangle on the left hand side of the image below is the "fade in".
If the transient/beginning of the drum hit is cut off, the sound of the drum hit will not have as much impact. Also, Slate Trigger uses the transient to initiate/trigger the playback of a sample. You could get triggering errors if this is not corrected.

If the fade in is cutting off the transient then select the clip and nudge the audio within the clip until the transient is no longer truncated/cut off by the fade in.
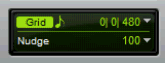
Set the nudge value:
- Left click on the tiny drop down arrow (see image below).
- Left click on "100 Samples" to begin, change to 10 as/if needed.

To nudge audio inside a clip without moving the clip:
- Select the drum hit you want to nudge (left click on the bottom half of drum hit clip).
- Press and hold down the "Windows Start key" (has the Windows logo on it).
- Press the + (plus) key to move backward and - (minus) key to move forward on the time line. You must use the + and - keys on the numeric keypad of your keyboard for this to work.
The image below shows the corrected drum hit clip after the audio in the clip has been nudged to the right and forward on the time-line using the - key.

Listen to all the drum hit clips to ensure there are no clicks or pops or other unwanted noise.
Consolidate the drum hit clips. You must consolidate each drum hit individually. Once they are consolidated you cannot shorten or lengthen them by dragging with the Trim tool. Once the files are consolidated you will no longer see the fade in/outs. The fades will be incorporated within the file.
To consolidate a clip:
- Select the clip.
- Press and hold down the Alt + SHIFT + 3 keys.
Export your drum hit sample files from Pro Tools:
- Select the files to export. Make a selection across all the files to export them in one batch.
- Press and hold down the Shift + Ctrl then K keys on your keyboard.
- Choose "WAV" as the File Type and "Interleaved" as the Format.
- Choose a "Bit Depth" of 24 and a "Sample Rate" of 44.1 kHz.
- Left click on the "Choose" button to select where you want to store your drum hit samples.
- Create a new folder to save your drum samples in. Name it something meaningful for example "Trigger Kick Samples".
- Left click on the "Export" button to export the files from Pro Tools.
The drum sample files are exported as .wav files.
Use the FREE Slate Trigger 2 Instrument Editor to convert the .wav files into the .tci file format native to Slate Trigger. I've created a short tutorial on how to use the Trigger 2 Instrument Editor. I also provide download links to both the Slate Trigger 2 Instrument Editor and its manual in .pdf.
TIPS:
File management - Be organized!
- Create a naming system to keep your drum sample files organized.
- Copy the files you created into Slate Trigger's sample library. Store your files in folders that are assigned meaningful names. At this stage the files we created are .wav files. They can be used by plug-ins other than Slate Trigger. Keep them just in case you change to using a plug-in other than Slate Trigger.
- Back up your sample files to an external, online drive or both.
Watch Bobby's video here: How To Make Your Own Drum Samples (And Load Them Into Slate Trigger)
Single key shortcuts used in this tutorial
Press the letter:
- b - to break/cut/separate at the cursor or both sides of a selection
- x - to delete a selection
- z - to undo the last operation
- c - to copy the selection
- v - to paste
Multi key shortcuts
To heal a break/cut/separation:
- Make a selection over the break/cut/separation.
- Press and hold down the Ctrl + h keys to heal the break/cut/separation.
Create fades:
- Select the clip/drum hit you want to add a fade to.
- Press and hold down the Ctrl + f key to bring up the fade dialog.
- Set the fade in and fade out times to 5ms for this tutorial.
Consolidate a clip:
- Select the clip/drum hit
- Press and hold down the SHIFT + Alt + 3 keys
Export clip/s as files:
- Select the files to export
- Press and hold down the Shift + Ctrl + K keys on your keyboard