Tuesday, August 18, 2026

Fix Waves Tune Not Scanning - Outside session limits.

By TOM BOWSER

Issue: Waves Tune no longer scans the audio track you're attemping to pitch correct or add effects to.

Waves Tune has a 10 minute audio processing time limit per track in a session. When you reach the 10 minute mark on the DAW timeline it stops processing the track. I've outlined the "Outside session limits." message within the image below.

Waves Tune Outsite Session Limit Message

To use Waves Tune beyond 10 minutes on a track you must:

  1. Left click in your DAW's timeline to place your cursor at the point you want scanning to begin.
  2. Left click the small triangle in the top-right corner of Waves Tune to access the dropdown menu and select "Acquire Session Start Time from Timeline". See the image below.
Waves Acquire Session Start Time from Timeline Message

Tuesday, January 6, 2026

Show the Edit and Mix Windows

By TOM BOWSER

Can't see the Edit or Mix window in an open Pro Tools session? Not sure how to show (re-open) the missing window(s)?

Show (open) The Edit and Mix Windows:

  1. Left click on "Window" on the Pro Tools menu bar then left click on either "Mix" or "Edit" to show your missing window.

    The window that is currently active will have a check mark to the left of it's name. See the image below.

Show The Edit and Mix Windows - Method 2:

  1. Press and hold down Ctrl key then press the = key on your keyboard. The Edit window will open.

Press the Ctrl then = key combination again to show the Mix window. Use this key combination to toggle between the Edit or Mix windows when they are open.

Tuesday, December 30, 2025

Clear All Automation From a Track

By TOM BOWSER

Clear All Automation From a Track

The following tip will clear ALL automation on a track. You DO NOT need to have the automation showing on the track to clear it using the directions below.

  • Left click in the lower half of the track.

Pro Tools Track Before It Is Selected

  • Press and hold down the Ctrl key on your keyboard.
  • Press then release the letter "a" key on your keyboard to select the entire track. The track/region background color becomes darker once selected. See image below.

Pro Tools Track After It Is Selected

  • On the Pro Tools menu bar, left click on Edit > Clear Special > All Automation.

Monday, November 24, 2025

The Rock Band Kansas & The Room In The Basement

By TOM BOWSER
Picture of the back of the album kansas by the band kansas. Photo by Don Hunstein.

My high school friend Bob Mueller had invited Kevin Swanson and me over to his parents flat with a singular purpose in mind.

As I remember it the room in the basement had some comfortable old living room furniture in it. The single window was covered with a stained, ratty old shade. It was cool, dark, damp and a little musty smelling like most basements in older homes. A couple of posters were beginning to peel off the brick walls and a single "black light bulb" was the sole source of illumination. The room in the basement was a womb. There was no TV, no phone, it was quiet. An older home stereo system and a stack of Bob's favorite vinyl records were the only other thing in the room.

The room in the basement was where I discovered the American rock band Kansas. As a violinist in our highschool orchestra I was a bit shocked. Violin in a rock band? It sounded good, really good! Everything about it was right!

Photograph of the Dane County Coliseum in Madison, Wi with a half of a ticket from the 1977 Kansas concert.

We went to see Kansas perform at the Coliseum in Madison, WI as they toured to support their album "Point of Know Return" in 1977 I believe. They were every bit as good live as on their albums.

I recently saw the movie Kansas: Miracles Out of Nowhere. It brought me back to the time my friends and I spent sharing our common love of music in the room in the basement.

Do you remember where you were when you first heard your favorite band or song?

At the time I wrote this post Kansas: Miracles Out of Nowhere was playing for FREE on tubi. If you are a fan of the band Kansas or a fan of American rock music you will probably enjoy the movie. I know I did!

Thursday, November 13, 2025

Millions of Free Listenable, Downloadable Music Files!

By TOM BOWSER
Close up picture of a woman's hand flipping through a stack of vinyl records in a record store.

The "Internet Archive is a non-profit library of millions of free texts, movies, software, music, websites, and more", so much more. It's all FREE, that's no charge to you my friend.

Lots of music, I mean, LOTS OF MUSIC! A wondrous variety. Digitized vinyl albums and other audio you probably won't find anywhere else at this time.

The sound quality of the music I've downloaded and streamed seems better than the free services of most BIG NAME online services. The sound quality of some of the digitized vinyl album collections is often surprisingly good.

CONS:

  1. Searching and finding what you want can be an exercise in patience.
  2. I wonder if the musicians, artists and other creatives are being appropriately compensated?

For those of you who have not "been", I suggest you haul your ass over to the Internet Archive and get you some before it's all gone.


For your edification and a quick quality test I present David McCallum's song "The Edge" from his Vinyl LP Album entitled "Music: A Bit More of Me" which was released in 1967 by Capitol Records. My wife and I dig the groovy 1960s era vibe.

Who knew that David McCallum, the guy who played the chief medical examiner, Dr. Donald "Ducky" Mallard on the American TV series NCIS, was also a talented musician?

I downloaded the song "The Edge" as an .MP3 file from the Internet Archive. What do you think about the sound quality? How does it compare to the sound quality of the same song available on other online services?

Friday, November 7, 2025

Add Plugins To The Favorites List

By TOM BOWSER

I create a "favorites" list for the plugins I routinely use. I find it helps me work faster, more efficiently and with less distraction. It reduces the time spent looking for plugins.

Your favorite plugins will show at the top of the Plug-In selector pop-up menu. Favorites will appear bold and colored yellow when seen in plug-in menus.

To create a plugin favorites list:

  1. Press and hold down the CTRL key on your keyboard.
  2. Left click on an insert of a track. An insert looks like a blank rectangular space with a black dot on the left hand side. I've drawn a red line around an insert in the image below.

The insert selector on a Pro Tools track

  1. Hover your mouse cursor over the word "plug-in" on the menu that appears.
Plug-ins List Menu In Avid Pro Tools
  1. Left click on a plugin you want to add to your favorites list. Remember, you need to hold down the CTRL key.

The "TENS (mono)" reverb plug-in was added as a favorite to the top of my plugins list. (see image below)

Plug-ins Menu In Avid Pro Tools

To remove a plugin from the favorites list:

  1. Press and hold down the CTRL key on your keyboard.
  2. Left click on the favorite you want to remove.

Rearrange Controls and Displays On The Edit Window Toolbar

By TOM BOWSER

The Edit Window Toolbar is located across the top of the Edit window.

Understanding how to rearrange the controls and displays on the Edit Window toolbar can be useful if you find yourself working with Pro Tools outside your usual environment for example, at a friend's house or in a different studio.

Having the Edit Window Toolbar arranged as you are used to makes working in a new environment less stressful.

To move a control or display:

  1. Press and hold down the CTRL key on your keyboard.
  2. Move your mouse cursor to the edge of a control or display you want to move. When your mouse cursor turns into a hand (grabber) then…
Display on the Pro Tools Menu Bar Showing The Grabber Hand
  1. Left click and hold down your left mouse button. Drag the control or display horizontally to a new location on the Edit Window Toolbar. As you drag the control or display a yellow vertical bar will appear to mark the new position.
  2. Release your left mouse button at the position you want to move the control or display.

NOTE: Changes you make to the Edit Window Toolbar are saved on a per session basis. Each new session begins with the Pro Tools default layout.

Wednesday, November 5, 2025

Change How Plug-ins Are Listed in Pro Tools

By TOM BOWSER

Left click on:

  • Setup then Preferences on the Pro Tools menu bar
  • the Display tab
  • on the dropdown arrow next to Organize Plug-In Menu By:
Display Tab Of The Pro Tools Preferences Window
  • Select either Flat List, Category, Manufacturer, or Category & Manufacturer.

I prefer to organize my plug-ins by Category & Manufacturer (see image below). This setting gives you the most information in the least amount of space. The alphabetically arranged "Flat List" can get very long.

Pro Tools Plug-In Selector Pop-Up Menu

Saturday, October 11, 2025

Control Plug-ins Simultaneously On Multiple Tracks

By TOM BOWSER

In this Avid Pro Tools tutorial I show you how to simultaneously control the settings of the same plug-in installed on two or more tracks.

This might be useful if you want to process (equalization, compression, other), 2 separate drum overhead tracks (1 Left + 1 Right), doubled guitars or vocals.

NOTE: The plug-ins you want to control must be inserted on the same letter insert on ALL tracks. Inserts are assigned the letters A through J to identify them. See the image below.

Plug-in Inserts in Avid Pro Tools

Create a "group" that includes your tracks:

  1. Press and hold down the SHIFT key on your keyboard.
  2. Left click on the name of each track to select it. The background should turn white.
  3. Press and hold down the CTRL key on your keyboard then press the letter g. The Create Group window opens.
  4. Type a name for your group in the box next to “Name:”.
  5. Verify the tracks you want to include are listed in the box beneath the heading “Currently in Group:”.
  6. Left click on the “OK” button to save your changes.

Open the Modify Groups window:

  1. Right click on the name of the group you created. Groups are listed beneath the “GROUPS” heading in the Pro Tools Edit window.
  2. Left click on the word “Modify…” in the menu that appears.

In the Modify Groups window:

  1. Left click on the "Attributes" tab.
  2. Remove the checkmark to the left of “Follow Globals”.
  3. Press and hold down the ALT key on your keyboard then left click in a single checkbox under both the “Controls” and “Bypass” headings. All should become selected. See image below.
  4. Left click on the “OK” button to save your changes.
The Attributes tab of the Modify Groups window in Avid Pro Tools

Open 2 of the plug-ins you want to simultaneously control. Arrange them next to each other. Now, when you move a control on 1 of the plug-ins the same control will move on the other plug-in.

Friday, June 20, 2025

Sub Mix Tracks - Combine The Output of Multiple Tracks

By TOM BOWSER

In this Avid Pro Tools tutorial I demonstrate how to create a submix of the outputs of multiple tracks. You can then control the output level of all the tracks as a collection or group.

  • You might submix/combine multiple instruments, for example, all the drums of a drum set. The level of the drum submix could then be raised or lowered as a whole mix as opposed to changing individual drum levels.
  • You may create a submix of background vocalists. You could create a "send" from the submix to an effects plug-in/unit like a reverb. This would enable you to use the same reverb and apply the same reverb level/amount to each vocalist in the submix.
  • You could process the submix as a group. You could add a compressor and/or equalizer to the submix and process all the combined signals or tracks (instruments, vocalists) at the same time and by the same amount.

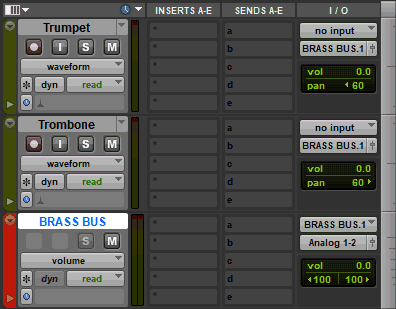
In the example steps below I create a submix for 2 brass instruments, one trumpet and one trombone.

Create a submix:

  1. Select the tracks you want to submix. Press and hold down the CTRL key then left click on the name of the track. The background will turn white.
Select the tracks you want to submix.
  1. Press and hold down the SHIFT + ALT keys.
  2. Left click on the "Audio Output Path selector" of one of the selected tracks.
Pro Tools Audio Output Path Selector
  1. Left click on “new track…” on the menu.
Pro Tools Audio Output Path Selector Menu

The “New Track” dialog window will open.

Pro Tools New Track Dialog Window

Select:

  • Width: Stereo
  • Type: Aux Input
  • Time Base: Samples
  • Name: You might type a name to describe what the submix combines. For this tutorial I used "BRASS BUS".
  • Left click on the “Create” button.
  1. Press and hold down the CTRL key then left click on the "Solo" button of the new submix aux track. (The Solo button will turn light grey) See the BRASS BUS track in the image below.
Create a Su bmix in Pro Tools
  1. Choose a color for the new submix aux track's color bar (optional). Double left click the track's color bar then left click on a color to select it from the Color Palette window.

Overview:

  • A new "aux" track has been created called BRASS BUS.
  • The Trumpet and Trombone tracks have their outputs routed to the BRASS BUS input.
  • The BRASS BUS has its output routed to the stereo output of the hardware interface.
  • Plug-ins can be inserted on the submix aux track. You can now process (EQ, Compression) or add effects directly to all the tracks in the submix.
  • The BRASS BUS fader will now control the output level/volume of both the Trumpet and Trombone tracks.

I always use the same color for all my submix aux tracks. It makes it immediately obvious to me what the track is used for.

NOTE: If you want to pan the tracks of the submix to different positions in a stereo field then choose "Width: Stereo" in step 4. You might choose a "Width: Mono" if all the tracks assigned to the submix will be panned the same. You could then pan the submix using the pan control of the submix aux track fader.

Friday, January 3, 2025

Folk Musician Greg Brown - A Prairie Home Companion

By TOM BOWSER

I mixed live sound for folk musician Greg Brown during his sold-out performance at the University of Wisconsin's "Music Hall" back in the late 1980s. I'd never heard of him before. I've not forgotten him since that show. You never know where life will take you.

Greg Brown was a recurring performer on the weekly, nationally broadcast, radio variety show A Prairie Home Companion with Garrison Keillor.

At the time Greg was recording for the independent record label Red House Records in St. Paul, Minnesota.

I hope Greg Brown's song The Iowa Waltz brings you peace and joy in the new year. Listen Below

Members of the band:

  • Greg Brown - vocals, guitar
  • Dave Hansen - bass
  • Dave Moore - harmonica
  • Al Murphy - fiddle
  • Mike Watts - drums
  • John Welstead - drums
  • David Williams - banjo, guitar, mandolin

Wednesday, September 11, 2024

No One Does Funky Like The Ohio Players

By TOM BOWSER

Start with a base of signature vocals. Add a tight funky rhythm and horn section! Sprinkle in a little period wah-wah pedal to taste. A pinch of early string and other synth sounds. Top it all off with interesting arranging, recording and mixing. No one does funky like the Ohio Players.

Friday, August 9, 2024

PINK FLOYD - Live Sound In The 70s

By TOM BOWSER

A couple of high school friends and I went to see the 1977 PINK FLOYD Animals/In The Flesh concert at Milwaukee County Stadium in Wisconsin. Our friend Jim McNamara scored us "Field Passes". We sat on the grass about 150 feet in front of the sound system's front of house mix position. What I experienced that night is one of the reasons I got involved in audio production (Thanks Jim!).

Years later I was fortunate to work as part of the crew to set up Pink Floyd on 2 different tours, A Momentary Lapse of Reason, May 20, 1988, and The Division Bell, July 3, 1994 when they played Camp Randall Stadium in Madison, Wisconsin.

Hard-core Pink Floyd fans & tech heads may enjoy this look inside the technology behind Pink Floyd's concert sound in those early years.

Thursday, August 8, 2024

Enable All Plug-in Automation Controls

By TOM BOWSER

Enable All Plug-in Automation Controls:

Instantly enable all the available automation controls (parameters) for a plug-in.

  1. Open the plug-in for which you want to enable all automation controls.
  2. Press and hold down the Ctrl, Windows and Alt keys.
  3. Left click on the "Automation Enable" button at the top of the plug-in window. I've drawn a red line around the Automation Enable button in the image below.

Wednesday, July 31, 2024

Add Steven Slate Drums To A New Track In Pro Tools

By TOM BOWSER

Did you download and install Steven Slate Drums (SSD or SSD FREE)? Not sure what to do next?

  1. Create a new stereo "Instrument" track. Press and hold down the CTRL + SHIFT keys then press the n key on your keyboard.
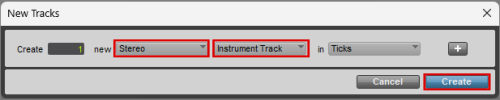
    1. Left click on the down arrow to the right of "new" then left click on "Stereo" to choose it. See image below.
    2. Left click on the next down arrow and left click on "Instrument Track" in the menu to choose it.
    3. Left click on the "Create" button.
    4. Rename the track to "SSD" (double left click the name).
Create New Stereo Instrument Track In Pro Tools
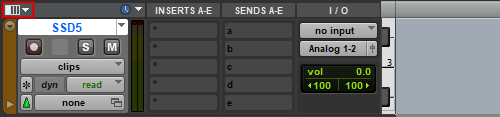
  1. Left click on the "Edit Window View" selector. I've drawn a red line around it in the image below.
Edit Window View Selector In Pro Tools
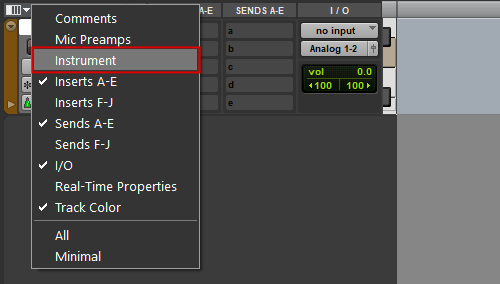
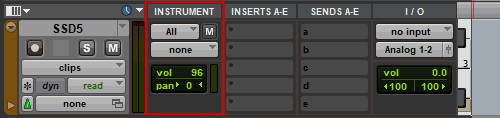
  1. Hover over the menu that appears and left click on the word "Instrument" to add a check mark to the left of it.

An Instrument track view is added to the track that provides controls for MIDI input, output, mute, volume, and pan.

An Instrument Track Showing The Instrument View In Pro Tools

Insert The SSD Plug-in On The Instrument Track:

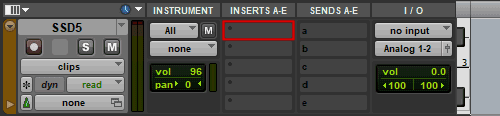
  1. Left click on the top "INSERT" (insert A) of the new instrument track. An insert looks like a blank rectangular space with a black dot in the upper left-hand corner. The small black dot is called the "insert selector". I've drawn a red line around insert A in the image below.
Insert Selector On An Instrument Track In Pro Tools
  1. Hover your mouse cursor over the words "multichannel plug-in" on the menu.
  2. Hover over "Steven Slate" on the next menu that appears.
  3. Left click on "SSDSampler (stereo)".

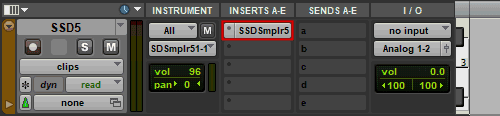
The SSD plug-in window should open. If it does not open left click on the SSD plug-in "insert button" that now populates the track insert. I've drawn a red line around the SSD plug-in insert button in the image below.

Insert Button On An Instrument Track In Pro Tools

TEST The SSD Plug-in:

I'm using SSD FREE as my reference for the following instructions.

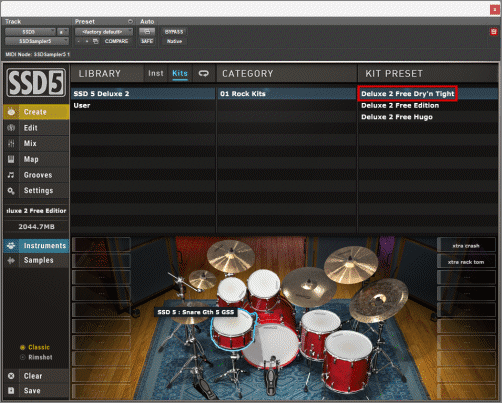
  1. Double left click on the top most title under the "KIT PRESET" heading of the SSD plug-in window. I've drawn a red line around what I'm referring to in the image below. The drum instruments for the kit will load.
Steven Slate Drums Plug-in Window
  1. Left click on any drum or cymbal within the virtual drum set at the bottom of the SSD plug-in window. You should hear the sound of the drum or cymbal you click on.

Monday, July 29, 2024

Create MIDI Tracks From Recorded Drum Tracks

By TOM BOWSER

The following steps demonstrate how to use Steven Slate Trigger to create a MIDI drum track from an audio drum track. The MIDI drum track can then be used to trigger drum samples in some virtual drum plugins.

You will need a copy of Steven Slate Trigger to work through this tutorial. You can purchase a copy of TRIGGER at Steven Slate Drums. Unfortunately, the FREE version of TRIGGER will not work for this tutorial. The MIDI capture feature used in this tutorial is disabled on it.

Review my tutorial Slate Trigger 2 - Getting Started if you're new to using Trigger.

  1. Insert Trigger on the audio drum track you want to convert to MIDI. For this tutorial I use an audio kick drum track.
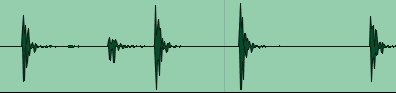
Kick Drum Audio Track In Avid Pro Tools
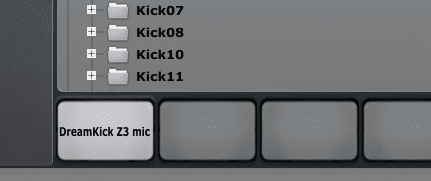
  1. Load an "Instrument" into Trigger. For this tutorial I chose a kick drum instrument. See the image below.
Picture Of Currently loaded Instrument (Drum Sample) Loaded Into Steven Slate Trigger
  1. Optimize the triggering settings of the Slate Trigger plug-in inserted on the audio drum track. If Trigger does not detect a hit it will not convert it to MIDI. You will have missing drum hits in the MIDI track Trigger creates.
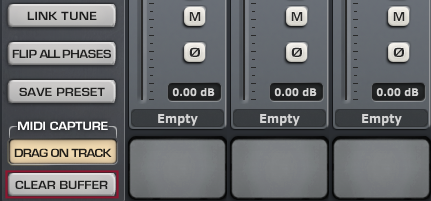
  1. Left click on the "CLEAR BUFFER" button at the bottom left side of the Trigger Plug-in. I've drawn a red line around the CLEAR BUFFER button in the image below.
Steven Slate Trigger Clear MIDI Buffer Button
  1. Left click on the "Return to Zero" button in the Pro Tools transport window to move the playback cursor to the beginning of the track.
Pro Tools Transport Window With Return To Zero Button
  1. Press your keyboard's spacebar or left click on the green play button (green triangle) of the Pro Tools transport window to begin converting the audio track to MIDI.
  1. Press the spacebar on your keyboard to stop the Pro Tools playback cursor when it has reached the end of the audio track. You can also left click on the square "Stop" button on the transport to stop playback.
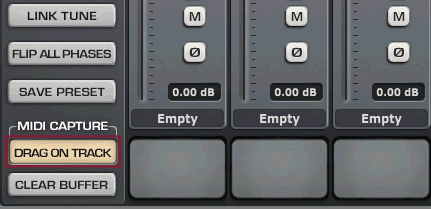
  1. Left click and hold down your left mouse button on the "DRAG ON TRACK" button at the bottom left corner of the Trigger window.
Steven Slate Trigger Drag On Track Button
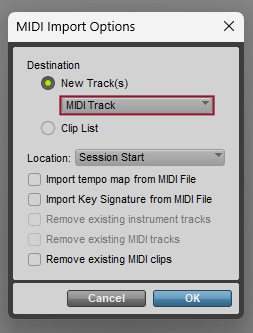
  1. Drag your mouse cursor onto a blank section of the "Edit Window" then release your left mouse button. The "MIDI Import Options" window will appear.
MIDI Import Options Window
  1. Left click on the drop-down arrow under "Destination > New Track(s)" and select "MIDI track". (see the above image)
  2. Left click on the "OK" button.

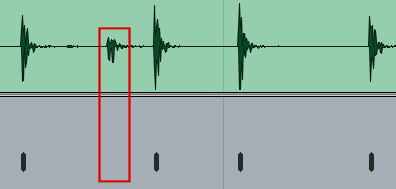
A new MIDI track is created. It will display a series of black vertical lines. Each black vertical line in the MIDI track should correspond to a drum hit in the original drum track (kick drum track in this tutorial). (see the image below).

Kick Drum Audio Track And Kick Drum MIDI Track In Avid Pro Tools
  1. Review the new MIDI drum track and verify that it includes a black vertical line for each drum hit in the audio track.
  2. Name the new MIDI track. For example, "Kick MIDI".

NOTE: As I mentioned in Step 2, you need to optimize the triggering settings of the Slate Trigger plug-in BEFORE converting to MIDI. If you do not you may have extra or missing drum hits in your MIDI track. In the image above, I've drawn a red line around a kick drum hit that was not detected in the audio track and not written to the MIDI track.