Wednesday, September 11, 2024

No One Does Funky Like The Ohio Players

By TOM BOWSER

Start with a base of signature vocals. Add a tight funky rhythm and horn section! Sprinkle in a little period wah-wah pedal to taste. A pinch of early string and other synth sounds. Top it all off with interesting arranging, recording and mixing. No one does funky like the Ohio Players.

Friday, August 9, 2024

PINK FLOYD - Live Sound In The 70s

By TOM BOWSER

A couple of high school friends and I went to see the 1977 PINK FLOYD Animals/In The Flesh concert at Milwaukee County Stadium in Wisconsin. Our friend Jim McNamara scored us "Field Passes". We sat on the grass about 150 feet in front of the sound system's front of house mix position. What I experienced that night is one of the reasons I got involved in audio production (Thanks Jim!).

Years later I was fortunate to work as part of the crew to set up Pink Floyd on 2 different tours, A Momentary Lapse of Reason, May 20, 1988, and The Division Bell, July 3, 1994 when they played Camp Randall Stadium in Madison, Wisconsin.

Hard-core Pink Floyd fans & tech heads may enjoy this look inside the technology behind Pink Floyd's concert sound in those early years.

Thursday, August 8, 2024

Enable All Plug-in Automation Controls

By TOM BOWSER

Enable All Plug-in Automation Controls:

Instantly enable all the available automation controls (parameters) for a plug-in.

  1. Open the plug-in for which you want to enable all automation controls.
  2. Press and hold down the Ctrl, Windows and Alt keys.
  3. Left click on the "Automation Enable" button at the top of the plug-in window. I've drawn a red line around the Automation Enable button in the image below.

Wednesday, July 31, 2024

Add Steven Slate Drums To A New Track In Pro Tools

By TOM BOWSER

Did you download and install Steven Slate Drums (SSD or SSD FREE)? Not sure what to do next?

  1. Create a new stereo "Instrument" track. Press and hold down the CTRL + SHIFT keys then press the n key on your keyboard.
    1. Left click on the down arrow to the right of "new" then left click on "Stereo" to choose it. See image below.
    2. Left click on the next down arrow and left click on "Instrument Track" in the menu to choose it.
    3. Left click on the "Create" button.
    4. Rename the track to "SSD" (double left click the name).
Create New Stereo Instrument Track In Pro Tools
  1. Left click on the "Edit Window View" selector. I've drawn a red line around it in the image below.
Edit Window View Selector In Pro Tools
  1. Hover over the menu that appears and left click on the word "Instrument" to add a check mark to the left of it.

An Instrument track view is added to the track that provides controls for MIDI input, output, mute, volume, and pan.

An Instrument Track Showing The Instrument View In Pro Tools

Insert The SSD Plug-in On The Instrument Track:

  1. Left click on the top "INSERT" (insert A) of the new instrument track. An insert looks like a blank rectangular space with a black dot in the upper left-hand corner. The small black dot is called the "insert selector". I've drawn a red line around insert A in the image below.
Insert Selector On An Instrument Track In Pro Tools
  1. Hover your mouse cursor over the words "multichannel plug-in" on the menu.
  2. Hover over "Steven Slate" on the next menu that appears.
  3. Left click on "SSDSampler (stereo)".

The SSD plug-in window should open. If it does not open left click on the SSD plug-in "insert button" that now populates the track insert. I've drawn a red line around the SSD plug-in insert button in the image below.

Insert Button On An Instrument Track In Pro Tools

TEST The SSD Plug-in:

I'm using SSD FREE as my reference for the following instructions.

  1. Double left click on the top most title under the "KIT PRESET" heading of the SSD plug-in window. I've drawn a red line around what I'm referring to in the image below. The drum instruments for the kit will load.
Steven Slate Drums Plug-in Window
  1. Left click on any drum or cymbal within the virtual drum set at the bottom of the SSD plug-in window. You should hear the sound of the drum or cymbal you click on.

Monday, July 29, 2024

Create MIDI Tracks From Recorded Drum Tracks

By TOM BOWSER

The following steps demonstrate how to use Steven Slate Trigger to create a MIDI drum track from an audio drum track. The MIDI drum track can then be used to trigger drum samples in some virtual drum plugins.

You will need a copy of Steven Slate Trigger to work through this tutorial. You can purchase a copy of TRIGGER at Steven Slate Drums. Unfortunately, the FREE version of TRIGGER will not work for this tutorial. The MIDI capture feature used in this tutorial is disabled on it.

Review my tutorial Slate Trigger 2 - Getting Started if you're new to using Trigger.

  1. Insert Trigger on the audio drum track you want to convert to MIDI. For this tutorial I use an audio kick drum track.
Kick Drum Audio Track In Avid Pro Tools
  1. Load an "Instrument" into Trigger. For this tutorial I chose a kick drum instrument. See the image below.
Picture Of Currently loaded Instrument (Drum Sample) Loaded Into Steven Slate Trigger
  1. Optimize the triggering settings of the Slate Trigger plug-in inserted on the audio drum track. If Trigger does not detect a hit it will not convert it to MIDI. You will have missing drum hits in the MIDI track Trigger creates.
  1. Left click on the "CLEAR BUFFER" button at the bottom left side of the Trigger Plug-in. I've drawn a red line around the CLEAR BUFFER button in the image below.
Steven Slate Trigger Clear MIDI Buffer Button
  1. Left click on the "Return to Zero" button in the Pro Tools transport window to move the playback cursor to the beginning of the track.
Pro Tools Transport Window With Return To Zero Button
  1. Press your keyboard's spacebar or left click on the green play button (green triangle) of the Pro Tools transport window to begin converting the audio track to MIDI.
  1. Press the spacebar on your keyboard to stop the Pro Tools playback cursor when it has reached the end of the audio track. You can also left click on the square "Stop" button on the transport to stop playback.
  1. Left click and hold down your left mouse button on the "DRAG ON TRACK" button at the bottom left corner of the Trigger window.
Steven Slate Trigger Drag On Track Button
  1. Drag your mouse cursor onto a blank section of the "Edit Window" then release your left mouse button. The "MIDI Import Options" window will appear.
MIDI Import Options Window
  1. Left click on the drop-down arrow under "Destination > New Track(s)" and select "MIDI track". (see the above image)
  2. Left click on the "OK" button.

A new MIDI track is created. It will display a series of black vertical lines. Each black vertical line in the MIDI track should correspond to a drum hit in the original drum track (kick drum track in this tutorial). (see the image below).

Kick Drum Audio Track And Kick Drum MIDI Track In Avid Pro Tools
  1. Review the new MIDI drum track and verify that it includes a black vertical line for each drum hit in the audio track.
  2. Name the new MIDI track. For example, "Kick MIDI".

NOTE: As I mentioned in Step 2, you need to optimize the triggering settings of the Slate Trigger plug-in BEFORE converting to MIDI. If you do not you may have extra or missing drum hits in your MIDI track. In the image above, I've drawn a red line around a kick drum hit that was not detected in the audio track and not written to the MIDI track.

Tuesday, February 6, 2024

Set Pre or Post Fader Metering

By TOM BOWSER

Pro Tools is set to use pre-fader metering by default. You know Pro Tools is set to pre-fader metering if you move a volume fader up or down and the level shown by the meter does not change.

To set either pre or post-fader metering:

  1. Left click on "Options" on the Pro Tools menu bar.
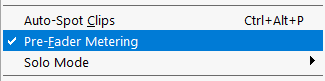
  • If "Pre-Fader Metering" has a checkmark to the left then pre-fader metering is being used in the session. See the image below.
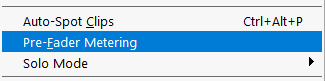
  • If there is no checkmark then "Post-Fader Metering" is used in the session.

Pre (before) Fader Metering: The meter shows the level of the audio signal BEFORE it passes the volume fader. If you move the volume fader up or down the signal level the meter displays will remain the same.

Post-fader Metering: The meter shows the audio signal after it has passed through plug-ins inserted on the track and after the volume fader.

If you move the volume fader higher, the signal level the meter displays will increase. If you move the volume fader lower, the signal level the meter displays will decrease.

Typically, pre-fader metering is used during recording to set levels coming into your DAW and post-fader metering is used when mixing.

Whether you use pre or post fader metering while mixing is a matter of preference. I like to view a new mix using pre-fader metering to verify that all track levels are where I expect them to be, no signal is too high or low.

Generally, once I begin to mix a session I switch to post-fader metering for the rest of the time I spend mixing.

Monday, January 22, 2024

The Blind Shake

By TOM BOWSER

I was feeling kind of depressed this morning. What do I do when I'm feeling down? Listen to music of course! Watch Minneapolis-based punk rock band The Blind Shake perform a high-energy live version of 'I’m Not An Animal'. This performance helped pull me out of the darkness and into the light again. I hope they help start your day!

Saturday, January 13, 2024

Undo History Window

By TOM BOWSER

Use the Pro Tools Undo History window to increase your speed and make fewer mistakes when editing.

You can undo or redo multiple operations at one time. You can see what can be undone or redone and are less likely to accidentally undo an edit you want to keep.

To open the Undo History window:

  • Left click on "Window" on the Pro Tools menu bar, then "Undo History"
Undo History Window With Track
  • Undoable operations are shown in bold. All operations performed after the item you select are also undone. See the image above.
  • Redoable operations (operations already undone) are shown in italics.
  • Left click on a bolded operation to undo it.
  • Left click on an operation in italics to redo it.
Undo History Window Showing - Undo -Redo All

Left click on the "Options Selector" to:

  1. Show Creation Times
Show Creation Times In The Pro Tools Undo History Window
  1. Undo All (operations in the undo history)
Undo All In The Pro Tools Undo History Window
  1. Redo All (operations in the undo history)
Redo All In The Pro Tools Undo History Window
  1. Clear Undo Queue
Clear Undo Queue In The Pro Tools Undo History Window

Monday, January 8, 2024

Reverse Changes You Made - Revert To Saved - Pro Tools

By TOM BOWSER

Not all changes made to a Pro Tools session can be undone or redone using the Undo History window or undo/redo key commands.

Use "Revert to Saved" if you need to undo changes that are no longer or never were available in the undo history.

  • Left click "File" on the Pro Tools menu bar, then "Revert to Saved" to reverse changes you made and restore the session to how it was the last time it was saved.
Revert to Saved to Reverse Changes You Made In Pro Tools

Thursday, January 4, 2024

Set Multiple Aux Track Inputs At The Same Time - Pro Tools

By TOM BOWSER

The following steps set the inputs of all selected aux tracks to a series of unused sequential buses. This process is faster than manually setting the input of each aux track individually. It works well when creating a new session or session template.

For this tutorial to work as described there must be sequential unused buses. You know a bus is NOT used when it's name is colored white, not yellow. For example, in the second image below the name "Buses 13-14 (Stereo)" is white and unused.

The aux tracks and buses must be the same width, either mono or stereo. In the example below, I'm using stereo Aux tracks that I pair with stereo buses

Set Multiple Aux Track Inputs At The Same Time:

  1. Select all of the tracks you want to set the input for. See the image below.
  2. Press and hold down the Shift + Ctrl + Alt keys on your keyboard.
  3. Left click on the Input Path selector of the first aux track in the group of tracks you want to set the input for. I've drawn a red line around the input selector of the Aux 1 track in the image below.
Input Path Selector In Pro Tools
  1. Hover your mouse cursor over the word "bus" on the menu.
Assign Buses To Inputs In Pro Tools
  1. Left click on an available pair of buses on the menu. Refer to the image above.

    In this example, I want to assign 3 sequential pairs of stereo busses to 3 stereo aux tracks. I'll select Buses 13-14 (Stereo). These buses will be assigned to the first selected stereo Aux track (Aux 1 in the image above). The Aux 2 track will automatically be assigned Bus 15-16 and the Aux 3 track will be assigned Bus 17-18. See the image below.

Set The Track Input To A Bus In Pro Tools