Wednesday, November 5, 2025

Change How Plug-ins Are Listed in Pro Tools

By TOM BOWSER

Left click on:

  • Setup then Preferences on the Pro Tools menu bar
  • the Display tab
  • on the dropdown arrow next to Organize Plug-In Menu By:
Display Tab Of The Pro Tools Preferences Window
  • Select either Flat List, Category, Manufacturer, or Category & Manufacturer.

I prefer to organize my plug-ins by Category & Manufacturer (see image below). This setting gives you the most information in the least amount of space. The alphabetically arranged "Flat List" can get very long.

Pro Tools Plug-In Selector Pop-Up Menu

Saturday, October 11, 2025

Control Plug-ins Simultaneously On Multiple Tracks

By TOM BOWSER

In this Avid Pro Tools tutorial I show you how to simultaneously control the settings of the same plug-in installed on two or more tracks.

This might be useful if you want to process (equalization, compression, other), 2 separate drum overhead tracks (1 Left + 1 Right), doubled guitars or vocals.

NOTE: The plug-ins you want to control must be inserted on the same letter insert on ALL tracks. Inserts are assigned the letters A through J to identify them. See the image below.

Plug-in Inserts in Avid Pro Tools

Create a "group" that includes your tracks:

  1. Press and hold down the SHIFT key on your keyboard.
  2. Left click on the name of each track to select it. The background should turn white.
  3. Press and hold down the CTRL key on your keyboard then press the letter g. The Create Group window opens.
  4. Type a name for your group in the box next to “Name:”.
  5. Verify the tracks you want to include are listed in the box beneath the heading “Currently in Group:”.
  6. Left click on the “OK” button to save your changes.

Open the Modify Groups window:

  1. Right click on the name of the group you created. Groups are listed beneath the “GROUPS” heading in the Pro Tools Edit window.
  2. Left click on the word “Modify…” in the menu that appears.

In the Modify Groups window:

  1. Left click on the "Attributes" tab.
  2. Remove the checkmark to the left of “Follow Globals”.
  3. Press and hold down the ALT key on your keyboard then left click in a single checkbox under both the “Controls” and “Bypass” headings. All should become selected. See image below.
  4. Left click on the “OK” button to save your changes.
The Attributes tab of the Modify Groups window in Avid Pro Tools

Open 2 of the plug-ins you want to simultaneously control. Arrange them next to each other. Now, when you move a control on 1 of the plug-ins the same control will move on the other plug-in.

Friday, June 20, 2025

Sub Mix Tracks - Combine The Output of Multiple Tracks

By TOM BOWSER

In this Avid Pro Tools tutorial I demonstrate how to create a submix of the outputs of multiple tracks. You can then control the output level of all the tracks as a collection or group.

  • You might submix/combine multiple instruments, for example, all the drums of a drum set. The level of the drum submix could then be raised or lowered as a whole mix as opposed to changing individual drum levels.
  • You may create a submix of background vocalists. You could create a "send" from the submix to an effects plug-in/unit like a reverb. This would enable you to use the same reverb and apply the same reverb level/amount to each vocalist in the submix.
  • You could process the submix as a group. You could add a compressor and/or equalizer to the submix and process all the combined signals or tracks (instruments, vocalists) at the same time and by the same amount.

In the example steps below I create a submix for 2 brass instruments, one trumpet and one trombone.

Create a submix:

  1. Select the tracks you want to submix. Press and hold down the CTRL key then left click on the name of the track. The background will turn white.
Select the tracks you want to submix.
  1. Press and hold down the SHIFT + ALT keys.
  2. Left click on the "Audio Output Path selector" of one of the selected tracks.
Pro Tools Audio Output Path Selector
  1. Left click on “new track…” on the menu.
Pro Tools Audio Output Path Selector Menu

The “New Track” dialog window will open.

Pro Tools New Track Dialog Window

Select:

  • Width: Stereo
  • Type: Aux Input
  • Time Base: Samples
  • Name: You might type a name to describe what the submix combines. For this tutorial I used "BRASS BUS".
  • Left click on the “Create” button.
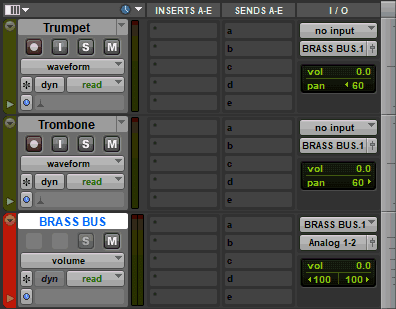
  1. Press and hold down the CTRL key then left click on the "Solo" button of the new submix aux track. (The Solo button will turn light grey) See the BRASS BUS track in the image below.
Create a Su bmix in Pro Tools
  1. Choose a color for the new submix aux track's color bar (optional). Double left click the track's color bar then left click on a color to select it from the Color Palette window.

Overview:

  • A new "aux" track has been created called BRASS BUS.
  • The Trumpet and Trombone tracks have their outputs routed to the BRASS BUS input.
  • The BRASS BUS has its output routed to the stereo output of the hardware interface.
  • Plug-ins can be inserted on the submix aux track. You can now process (EQ, Compression) or add effects directly to all the tracks in the submix.
  • The BRASS BUS fader will now control the output level/volume of both the Trumpet and Trombone tracks.

I always use the same color for all my submix aux tracks. It makes it immediately obvious to me what the track is used for.

NOTE: If you want to pan the tracks of the submix to different positions in a stereo field then choose "Width: Stereo" in step 4. You might choose a "Width: Mono" if all the tracks assigned to the submix will be panned the same. You could then pan the submix using the pan control of the submix aux track fader.