Thursday, January 4, 2024

Set Multiple Aux Track Inputs At The Same Time - Pro Tools

By TOM BOWSER

The following steps set the inputs of all selected aux tracks to a series of unused sequential buses. This process is faster than manually setting the input of each aux track individually. It works well when creating a new session or session template.

For this tutorial to work as described there must be sequential unused buses. You know a bus is NOT used when it's name is colored white, not yellow. For example, in the second image below the name "Buses 13-14 (Stereo)" is white and unused.

The aux tracks and buses must be the same width, either mono or stereo. In the example below, I'm using stereo Aux tracks that I pair with stereo buses

Set Multiple Aux Track Inputs At The Same Time:

  1. Select all of the tracks you want to set the input for. See the image below.
  2. Press and hold down the Shift + Ctrl + Alt keys on your keyboard.
  3. Left click on the Input Path selector of the first aux track in the group of tracks you want to set the input for. I've drawn a red line around the input selector of the Aux 1 track in the image below.
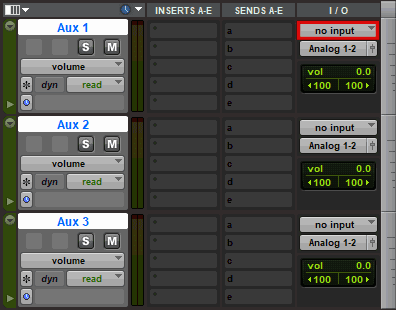
Input Path Selector In Pro Tools
  1. Hover your mouse cursor over the word "bus" on the menu.
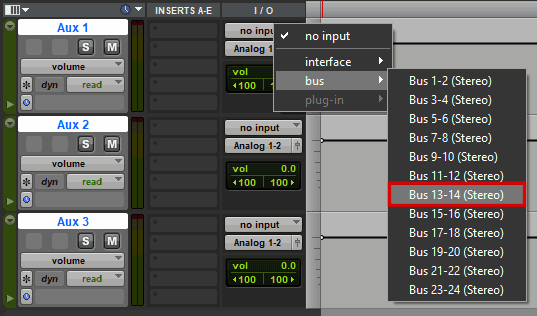
Assign Buses To Inputs In Pro Tools
  1. Left click on an available pair of buses on the menu. Refer to the image above.

    In this example, I want to assign 3 sequential pairs of stereo busses to 3 stereo aux tracks. I'll select Buses 13-14 (Stereo). These buses will be assigned to the first selected stereo Aux track (Aux 1 in the image above). The Aux 2 track will automatically be assigned Bus 15-16 and the Aux 3 track will be assigned Bus 17-18. See the image below.
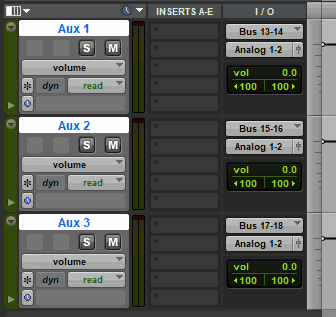

Set The Track Input To A Bus In Pro Tools

Monday, November 27, 2023

Use Clip Gain To Reduce Breath or Breathing Sounds - Pro Tools

By TOM BOWSER

REMINDERS:

  • Clip Gain in Pro Tools allows you to adjust the gain/signal level of a clip before it reaches plug-ins inserted on the track or the tracks output level fader.
  • The Clip Gain line is only visible if the track is set to size small or larger.
  1. Locate a breath or breathing sound you want to decrease. A breath between words in a vocal track often has a distinctive appearance that helps identify it. I've drawn a red rectangle around the sound of a vocalist breathing between words in the image below.
Breath Sound Within Vocal Track in Pro Tools
  1. Press and hold down the SHIFT + Windows logo keys then press the - key (hyphen) on your keyboard to show the Clip Gain Line. Press the - key again to toggle the visibility of the Clip Gain line. The Clip Gain Line is used to adjust the clip gain level.
Vocal Track Showing The Clip Gain Line
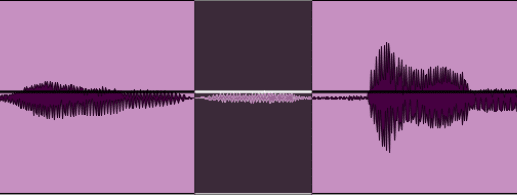
  1. Select the sound of the vocalist breathing (see image below).
Selection Of Breath Noise Within Vocal Track In Pro Tools
  1. Hover your mouse cursor near the Clip Gain Line until it changes into the Trim tool as in the image below.
Trim Tool Over Clip Gain Line In Pro Tools
  1. Press and hold down the SHIFT + Windows logo keys on your keyboard.
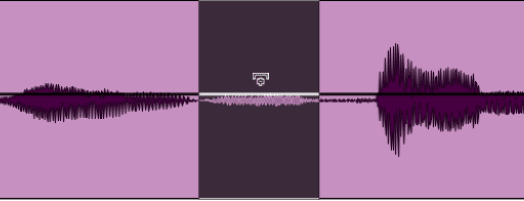
  1. Roll your mouse scroll wheel backward to reduce the Clip Gain level of the breath sound. Roll your mouse scroll wheel forward to increase the Clip Gain level if you've reduced the level too much. Press and hold down your left mouse button to verify the current Clip Gain level. See the image below.

    See #1 under TIPS: if you don't have a mouse with a scroll wheel.

Breath Noise Reduced With Clip Gain In Pro Tools
  • Listen to verify that the change you made sounds natural (if that's what you want). I suggest a -3 dB decrease or more as needed. If you decrease the Clip Gain level too much you may hear an obvious drop out in the sound during playback.
  • See tip #1 below if you don't have a mouse with a scroll wheel.

TIPS:

  1. Another way to modify the Clip Gain level once a selection has been made is to:
    • Press and hold down the SHIFT and Windows logo keys.
    • Press the down arrow key on your keyboard to decrease or up arrow key to increase the Clip Gain level.
  1. Increase your speed and consistency. Once you've selected a breath sound and decreased its Clip Gain level:
    1. Right click within the area you selected.
    2. Hover your mouse over the word "Clip Gain" on the menu.
    3. Left click on "Copy Clip Gain".
    4. Move to the next breath sound and select it.
    5. Right click within the selection.
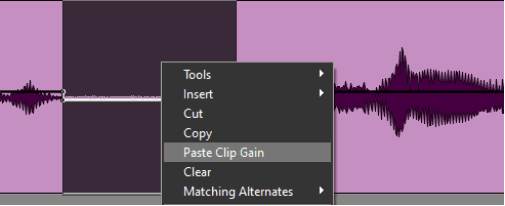
    6. Left click on "Paste Clip Gain" from the menu.
Paste Clip Gain In Pro Tools

Wednesday, November 8, 2023

View Both The Left & Right Channel Of A Multi-Mono Plug-in - Pro Tools

By TOM BOWSER

Split a stereo multi-mono plug-in into a separate left and right instance of the plug-in. This allows you to simultaneously view and independently adjust the controls of both the left and right sides of the plug-in.

  1. Press and hold down the ALT key on your keyboard.
  2. Left click on either the left or right channel selector of any multi-mono plug-in. A second plug-in will appear. It will be the opposite channel/side to the channel indicator you clicked on.

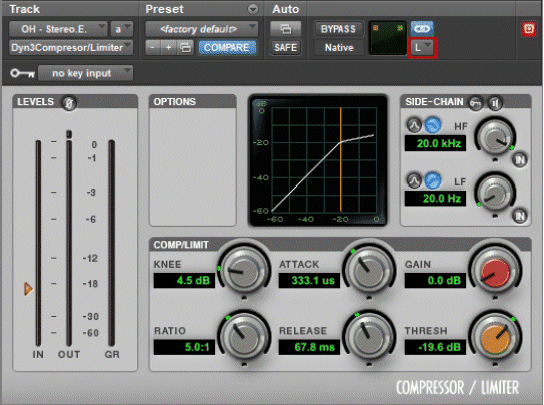
In the image below, I've drawn a red line around the left channel selector of a multi-mono version of the Dyn3 Compressor/Limiter included with Pro Tools.

The image below shows the left channel/side of a multi-mono version of the Dyn3 Compressor/Limiter inserted on a stereo channel.

Left Channel Side Of A Multi-mono Version Of The Dyn3 Compressor-Limiter In Pro Tools

The image below shows the right channel/side of a multi-mono version of the Dyn3 Compressor/Limiter.

Right Channel Side Of A Multi-mono Version Of The Dyn3 Compressor-Limiter In Pro Tools